
Every solar power system, whether it’s a small cabin setup, an RV, or a whole off-grid home, depends on a solar charge controller to run smoothly and safely. Consider it your traffic manager for electricity, managing the flow from your panels to batteries at an optimal rate while preventing overcharging, backfeeding, overheating, and short circuits. All these activities are performed silently, but also serve to maximize the energy produced from your panels.
Choosing the perfect solar charge controller is not just about buying the first one you see online-you have to associate it with the output of your system, the types of batteries used, and environmental conditions.
In this guide, I will explain the differences between PWM and MPPT solar charge controller technology, and how to install and configure them to enjoy their real-world benefits.
What is a Solar Charge Controller?
A solar charge controller is the link between your solar panels and your batteries. The solar regulator controls the flow of electricity through cables to prevent overcharging or damage to the batteries.
Modern regulators are so much more than simple voltage controllers. Many features come with LCD screens, Bluetooth connectivity, and programmed settings so you can track performance, charging history, and adjust settings in real time, whether on-site or in your office via your phone.
Types of Solar Charge Controllers
1. PWM Solar Charge Controller
PWM solar charge controllers are the budget-friendly, dependable option. This design works by lowering the panel voltage to the battery voltage. While it works great for smaller systems, it is much less efficient than MPPTs, especially when your panel voltage is much higher than your battery voltage. Best for: small, money-wise systems like cabins, boats, and RVs. Set up as a single panel.
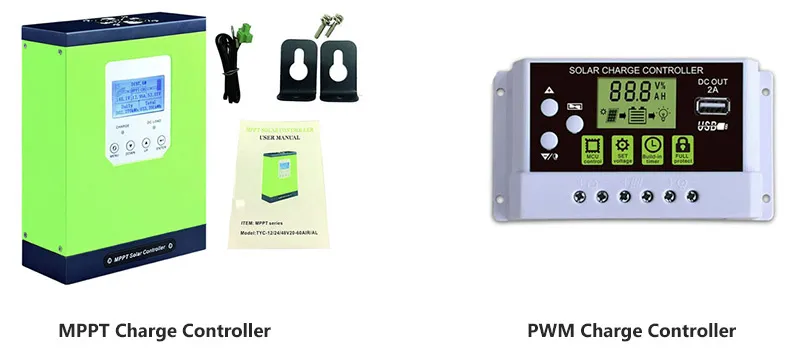
2. MPPT Solar Charge Controller
MPPT solar charge controllers ensure maximum efficiency. They actively adapt to input voltage variations, locating the “sweet spot” where your solar panels produce maximum power. This translates into about 15 to 30% more energy harvest than PWM, especially in cold, cloudy conditions or when panels are farther from batteries.
Best for: Large systems and high-performance setups where every watt counts.
Uses of a Solar Charge Controller
The solar charge controller is a multifaceted gadget that provides optimal regulation of solar energy use in varied applications. For example, the device is essential in off-grid solar systems and is a savior for places without grid access. It protects battery storage in such areas and prevents overcharging by ensuring batteries are charged even in the most isolated places, like remote cabins, agricultural sites, or rural homes.
During a power outage at home, solar installations with hybrid setups ensure the management of battery backup and thus the provision of electricity. This has specific applications, like in solar street lighting, where it guarantees proper charging even during cloudy weather to keep the lights on all night long; it will power such street lights.
This is mainly for practical applications in the remote power supply sector, such as telecommunication towers, security cameras, or rural electrification projects that lack opportunities for regular maintenance.
Portable solar kits, which include those for RVs, boats, camping trips, and disaster relief operations, are also examples of applications. A solar charge controller is a trusted and dependable power supply because it offers stable energy in times and places where it is most needed.
How to Choose the Best Solar Charge Controller
Choosing the best solar charge controller is key to maximizing your system’s performance, improving efficiency, and extending its lifespan. Here’s a detailed breakdown of why it matters
Match Controller Voltage to Battery Voltage
A particular solar charge controller is made for specific battery voltages, mostly 12, 24, or 48. Matching voltage ratings of the controller and battery bank is a must for smooth and safe charging.
A mismatch will put unnecessary strain on batteries and the controller, thereby messing up the processes or damaging either one. For example, smaller systems like RVs opt for 12-volt systems just to keep things simple, whereas bigger off-grid home setups tend to use a 48V system; higher voltage in big systems reduces wiring losses and increases efficiency.
Check Current Rating (Amps)
The current rating of your solar charge controller should, therefore, be above the maximum current that your solar panels can provide. In our example, two panels of 200W each on a 12V system can give about 33 amps under full sunlight conditions.
Hence, care should be taken to ensure a controller with a little bit higher current rating than required presently to allow for future expansion technically – that is, near 40 amps in this scenario. This extra measure ensures that there are no overloads and that the system remains functional.
Choose Between PWM and MPPT
PWM (Pulse Width Modulation) solar charge controllers are cheap options that work well for smaller or less complicated solar installations where efficiency isn’t a primary concern. Charging is controlled by lowering the panel voltage to the battery voltage.
Rather, one may say MPPT (Maximum Power Point Tracking) solar charge controllers are more complicated. These controllers monitor the voltage in the solar panel and adjust it, aiming for maximum energy output and increased power-harvesting efficiency of up to 30 percent.
Suppose you have a considerable system or want to get the most out of your solar investment. In that case, an MPPT solar charge controller is a must, especially if your solar system faces varying weather or a cooler climate.
Step-by-Step Guide: How to Use a Solar Charge Controller
Using a solar charge controller correctly ensures maximum efficiency and battery protection. Follow this expanded guide:
Read The Manual Thoroughly: Manufacturers often provide model-specific setup instructions, wiring diagrams, and safety warnings that are worth noting to prevent common mistakes, even with some experience.
Connect the Battery First: Make sure to connect the battery first and then the solar panel. This enables the controller to sense the system voltage correctly and prevents potential misconfiguration.
Connect the Solar Panels: Once the battery is connected, make the wiring for the solar panels to the controller, bearing polarity in mind of the solar panels. Reversed connections could harm the internal circuitry of the controller.
Set Charging Parameters: Set up the charge controller depending on battery chemistry like lead-acid, AGM, gel, or lithium. For example, lithium batteries demand elevated absorption voltages and no equalization charging.
Performance Monitor: You can monitor the charging voltage and current, battery state of charge, and daily energy harvest through the display on the controller or through a mobile app. This way, any problem can be identified quickly.
Keep the Controller While It Is Running: Look for corrosion on all the connections; tighten all loose wires; clean dust accumulated on the controller; and, if yours allows it, update the firmware.” Maintenance
Advantages of Using a Solar Charge Controller
Such premium types of solar charge controllers offer many benefits aside from just regulating voltage:
Protection for the Batter: Inhibits the overcharge, over-discharge, and reverse-flow currents, all of which shorten battery life or damage them irreversibly.
Better Long Term: MPPTs vary the input voltage to capture more energy under varying solar conditions up to 30% more than PWMs.
Long Battery Life: Proper regulation of the charging ensures that batteries remain at their perfect state of charge, so in the case of lead acid batteries, it avoids sulfation, thereby increasing battery life.
Safe Working: Safety procedures are built into guards against overheating, short circuiting, or electrical fires.
Scalable: Most controllers will allow system upgrades, so one can add more panels or larger batteries without having to replace the controller itself.
Summing Up
A solar charge controller is not just a small accessory; it’s the heart of a healthy solar battery system. Appreciating PWM and MPPT will help you install and use either device properly and thereby select the right size and features so that you maximize your solar investment.
Whether your setup is a small off-grid cabin or a big residential system, the appropriate solar charge controller offers safety and efficiency while ensuring years of reliable performance.