iPhones are adored by people globally. Although they provide many benefits, there are situations when customers must go to Android.
People who are getting used to iMessage want to use it on their Android phones too, but they don’t know how. This is a result of Apple forbidding Android from using this application. However, there are a couple of ways that you may use iMessage on Android device. That is the topic this blog will cover. Now let’s get going.
What is an iMessage? Is it Possible to Use it on Android Devices?
iMessage is Apple’s standard text messaging app. It works with any Apple device, including iPads. You can use it to send videos and photos as well. You’ll need Wi-Fi or cellular data on your phone to do this.
Apple is quite famous for its security. They provide end-to-end encryption for the iMessage app. This is why people love this app.
So, is it possible to use iMessage on Android? Yes, you can do it. Let’s see how.
Ways to Activate iMessage on Android
There are generally two ways to use iMessage on Android. You can follow this guide step by step to use these methods. Choose one that suits you.
Beeper
Beeper is an all-in-one messaging platform that provides around 15 texting platforms on a single hub. You can use this platform to use iMessage on Android and Windows. It will use your Apple ID to send and receive messages from iMessage, and you will feel no difference.
Steps to join the waitlist for Beeper Beta
You must sign up for the waitlist in order to access Beeper. After that, you will receive an email with a link that you must use to install Beeper on your computer. Be patient—the queue may be quite long, and you may have to wait for many days or months.
- To join the Beeper waitlist, go to its official Website: https://www.beeper.com/download.
- You can follow the link for the Beeper’s Waitlist.
Steps to setup Beeper
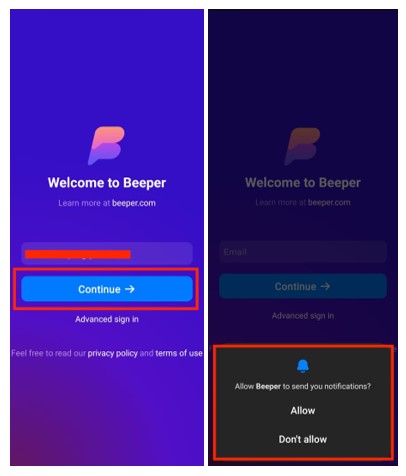
- Open your email on your PC and install Beeper on your PC from the invite in your email.
- Create your new account by giving some compulsory details.
- Set a strong Password for your beeper account.
- Follow the link to download the Beeper app on your Android phone.
- To log in to your Beeper account on your Android phone, scan the QR code from Your PC where you created your account.
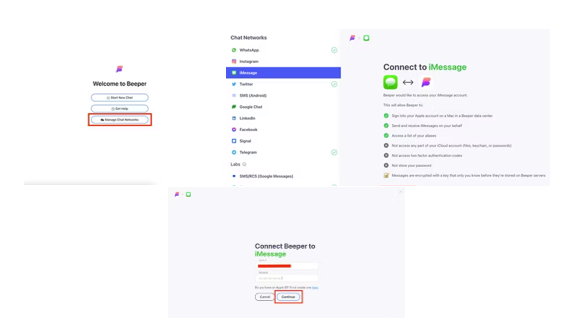
- Launch the app on your PC and click on Manage Chat Networks.
- Select the option of iMessage and click on Continue.
- To use your existing account, enter your Apple ID and your password.
- If you do not have an iMessage account, then you can create one by clicking on Create New Account.
- To activate your iMessage, verify your account.
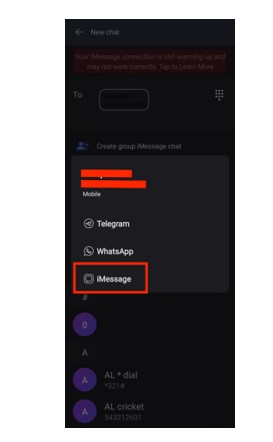
- Now open Beeper on your mobile phone and hit the Start a New Chat button.
- Search for the contact you want to chat with, select the option of iMessage and start texting.
AirMessage
To use iMessage on Android through AirMessage, you can follow these steps carefully, and then you are good to go. But you have to use Mac for the process.
Steps to set AirMessage on Mac
- Download and install AirMessage on your Mac.
- To run the app, move it to the Applications folder.
- You will see a recommended option to connect an account on the popup tab.
- Log in with your Google account.
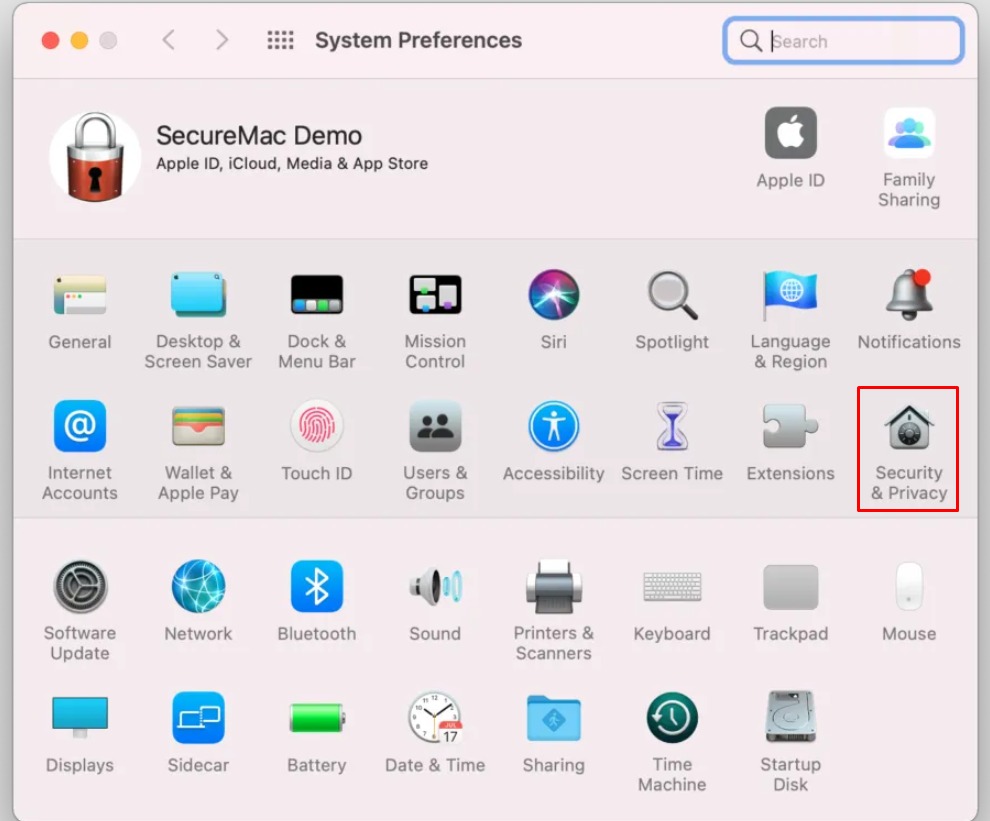
- To set up your Mac OS, go to the settings and select Security and Privacy.
- In the Privacy tab, select the option of Automation on the left tab.
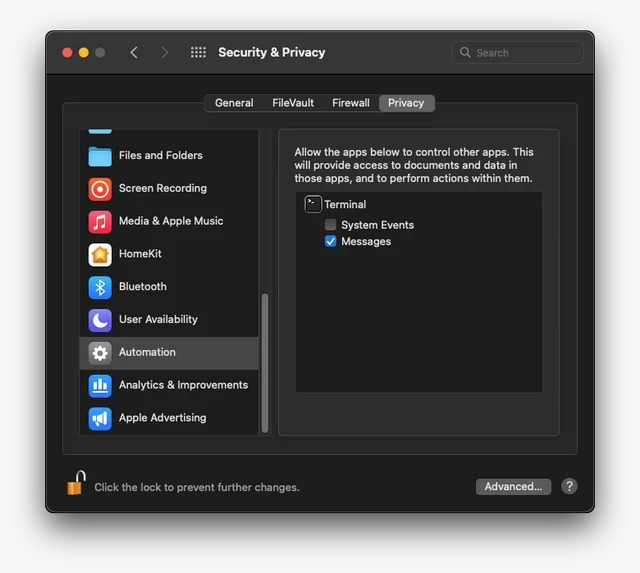
- Click on the lock icon on the bottom left corner of the screen.
- After entering your password, select the checkbox under AirMessage, and to save the changes, hit the lock option again.
- To enable Full Disk Access, go to System Preferences > Security & Privacy > Privacy; on the left bar, select the option of Full Disk Access.
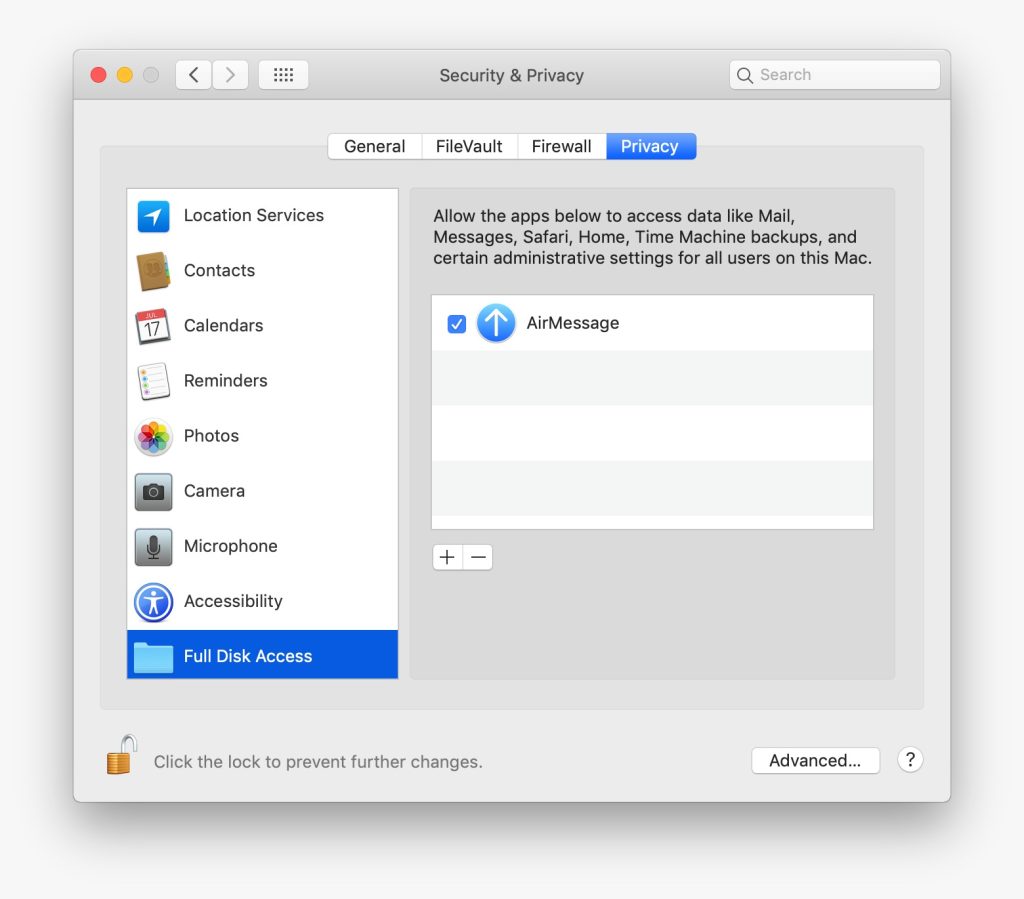
- Click on the Lock option again to enable the AirMessage, and click on Lock again to save changes.
Steps to Setup AirMessage on Android
- Install the AirMessage Application on your Android Phone.
- Use the Connect Account option to log in with the same account that you set up on your Mac.

- Hit the Chat button at the bottom right corner of the screen.
- Enter the contact number of the one you want to chat with through iMessage.
- To integrate your Android with your Mac, click on the Allow Confirm option. And you are able to use iMessage on Android now.
Summing Up
Using iMessage on an Android phone is a dream for some people. Since Android devices do not support it, using it can be a little tricky. Fortunately, there are some methods that you can utilize to do so. We have discussed these methods in detail in the information given above. Make sure to follow each step in order to execute these methods accurately.
FAQs
Why do people love iMessage?
People love iMessage for several reasons. Its visual appeal is one of them.
Is using third-party apps getting iMessage on Android safe?
Yes. The apps discussed in this article are safe to use. However, some third-party apps can harm your device.
Is my message data safe with these apps?
Yes. These apps do not use or share the data in your messages with any source.
Will Apple integrate iMessage with Android in the future?
There’s no authentic information available about it. Apple may not share this app with Android since it keeps most of its features to itself.