
In the realm of .NET development, establishing a robust connection with MySQL can significantly enhance your application’s data handling capabilities. This blog post is tailored for junior .NET developers eager to navigate the intricacies of database connectivity. We’ll embark on a step-by-step journey to integrate MySQL into your .NET application using the powerful ADO.NET data provider – dotConnect for MySQL. Beyond just a tutorial, we’ll uncover why dotConnect for MySQL emerges as the superior choice over native MySQL connectors, promising a blend of performance, flexibility, and ease of use that can elevate your development workflow.
Why dotConnect is a Great Choice for MySQL
Building dependable and high-performance .NET apps with MySQL databases is made easier with dotConnect for MySQL, which offers a feature-rich and trustworthy solution. This is true regardless of whether you are an experienced developer or just starting in the coding world. Now, let’s have a look at the reasons why dotConnect is the finest option:
1. Seamless Installation and Integration
– The dotConnect for MySQL features a simple installation process, making it possible for developers to set it up and include it in their applications swiftly. Click here to download dotConnect for MySQL.
– The fact that it is compatible with a wide range of .NET frameworks and integrates without any problems with Visual Studio makes it a flexible option for developers.

2. High Performance
– The data provider has been optimized for high speed, ensuring that applications written in .NET and MySQL databases can communicate quickly and effectively.
– Mechanisms for advanced connection pooling contribute to improved performance in tasks involving the retrieval and manipulation of data.
3. Integration with Visual Studio
– The easy integration with Visual Studio enables developers to take advantage of the capability of dotConnect for MySQL within the familiar surroundings of their development environment. You can check dotConnect compatibility here.
– Design-time support and visual tools simplify the process of developing databases while lowering the complexity of operations that are performed routinely.
4. Cross-Platform Compatible
– The dotConnect for MySQL offers cross-platform development, enabling developers to design applications compatible with several operating systems. This increases the flexibility and reach of the program.
5. Extensive Support for MySQL-Specific Features
– The broad support for MySQL-specific features, including stored procedures, triggers, and user-defined functions, makes it easier to take advantage of complex database capabilities.
– The support for ADO.NET Entity Framework and LINQ to MySQL gives developers the ability to interact with data in a way that is more object-oriented and expressive at the same time.
6. Security Features
– The dotConnect for MySQL prioritizes data security by providing support for SSL, SSH, and other encryption protocols. This helps to protect critical information while it is being sent.
– Application security may be further strengthened by using safe coding techniques and parameterized queries to protect against SQL injection attacks.
To demonstrate the simplicity of use and adaptability of dotConnect for MySQL in real-world applications, let’s now get into a practical example to see how it works by creating connections and carrying out queries. The purpose of this example is to walk you through the fundamental steps involved in implementing dotConnect for MySQL into your projects from start to finish.
Example of Connection with MySQL in .NET Application
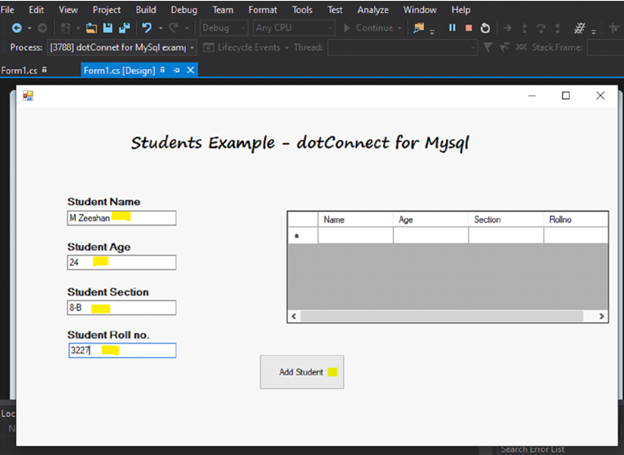
An example of a Windows form will be shown below. This example will demonstrate how we will enter data about students, such as the student’s name, age, section, and roll number. This information will be inserted into the respective text boxes. Immediately after the addition of data, we will display this data on a dataGridView.
Create Windows From
To begin, we will develop a Windows form that will allow users to submit information about students. To do this, please follow the steps given below:
- Create a new Windows Forms project in Visual Studio and give it a meaningful name.
- Now, search for Label, TextBox, Button, and a DataGridView using the left panel of the ToolBox.
- Simply move the items to the windows form by dragging and dropping them, and arranging them accordingly.
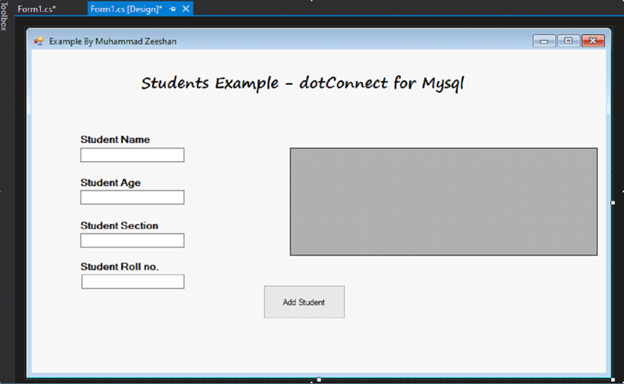
- It is necessary for you to provide each component with a relevant name that will be used to carry out actions via the component.
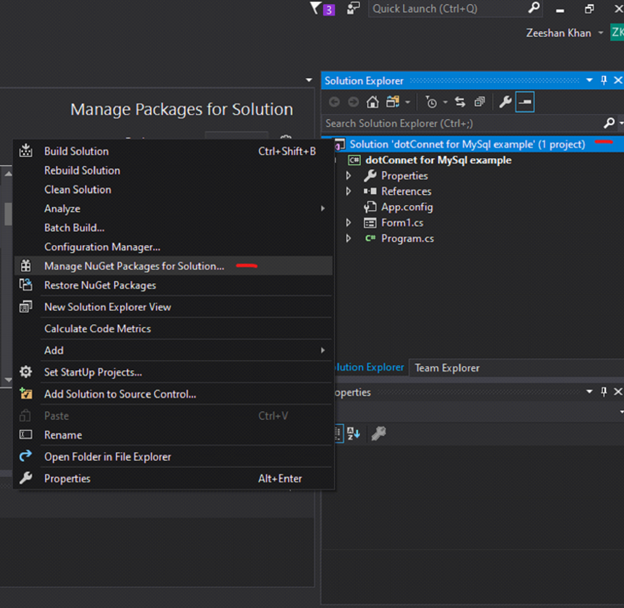
Add dotConnect for MYSQL NuGet Package
In the Solution Explorer, right-click on the Solution option, and click on Manage NuGet Packages for Solution… from the menu bar.
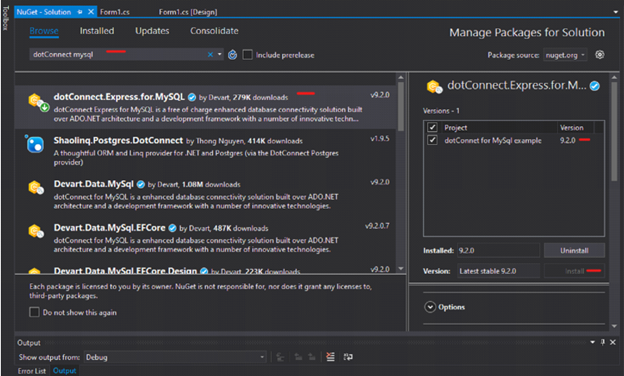
A new small window will appear. From the left panel, search dotConnect MySQL and then find dotConnect.Express.for.MySQL from the list, check the checkbox in the right-side small window and click on Install.
At this point, we have finished creating our Windows form, and it is time to write code to perform the desired tasks.
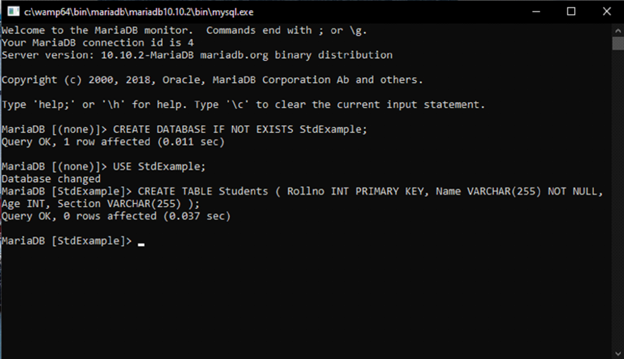
I’ll create a table named Students having Name, Age, Section, and Rollno as attributes in a database named StdExample. I am using MySQL Console in WampServer.
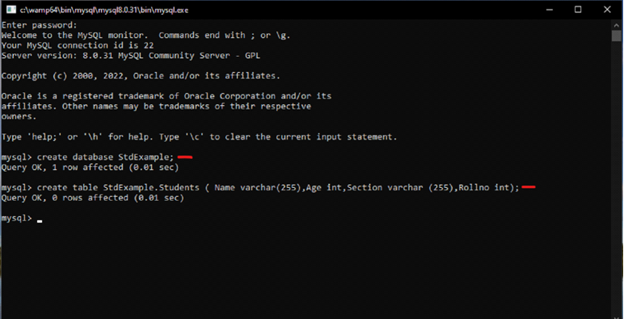
Or, If you are using MariaDB, you can follow the commands below and create a database and required table with attributes as below:
Let’s begin with the code:
Double-click on the Add the Student button on the Windows Form we created before to generate an event against it, here we’ll write all our code.
To begin, import the following libraries.
| using System; using Devart.Data.MySql; using System.Data; using System.Windows.Forms; |
Then, create variables of MySqlConnection, MySqlCommand, MySqlDataAdapter, and Dataset and name them connection, cmd, da, and ds respectively.
| public partial class Form1 : Form { private MySqlConnection connection; private MySqlCommand cmd; private MySqlDataAdapter da; private DataSet ds; } |
Initialize the database using your connection string, MySqlConnection, and MySqlCommand.
| private void InitializeDatabase() { string connectionString = @”Data Source=DESKTOP-F1SA8LE;Initial Catalog=StdExample; User Id=root;Password=;”; connection = new MySqlConnection(connectionString); cmd = new MySqlCommand(); connection.Open(); cmd.Connection = connection; cmd.CommandType = CommandType.Text; } |
Now, we’ll save inputs from textboxes to their relevant variables. Pass these variables to the database with the help of the Insert query, and then refresh dataGridView to reload newly added
| data using LoadStudentData(). private void AddStudentbtn_Click(object sender, EventArgs e) { // Add a new student to the database string name = txtName.Text; int age = Convert.ToInt32(txtAge.Text); string section = txtSection.Text; int rollno = Convert.ToInt32(txtRollno.Text); string insertQuery = $”INSERT INTO Students (Name, Age, Section, Rollno) VALUES (‘{name}’, {age},'{section}’,{rollno})”; cmd.CommandText = insertQuery; cmd.ExecuteNonQuery(); // Reload data to update DataGridView LoadStudentData(); // Clear input fields txtName.Text = “”; txtAge.Text = “”; txtSection.Text = “”; txtRollno.Text = “”; } |
Lastly, we’ll fill dataGridView with the Student data using the Select query.
| private void LoadStudentData() { // Load student data from the database string query = “SELECT * FROM Students”; da = new MySqlDataAdapter(query, connection); ds = new DataSet(); da.Fill(ds, “Students”); // Display data in DataGridView dataGridView1.DataSource = ds.Tables[“Students”]; } |
Now, Run the project, and add the student details to the Windows form.
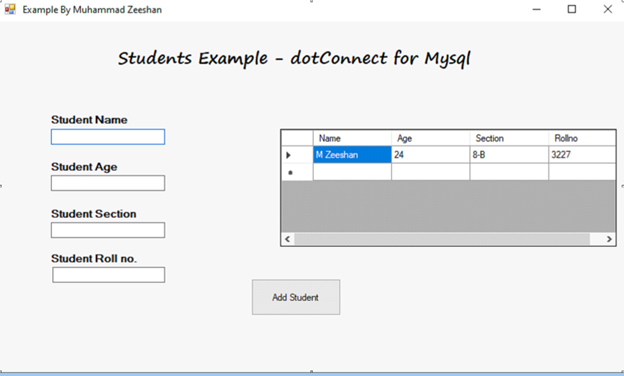
After you click on the Add Student Button, The data will be loaded into the dataGridView.
Complete Source Code
| using System; using Devart.Data.MySql; using System.Data; using System.Windows.Forms; namespace dotConnet_for_MySql_example { public partial class Form1 : Form { private MySqlConnection connection; private MySqlCommand cmd; private MySqlDataAdapter da; private DataSet ds; public Form1() { InitializeComponent(); InitializeDatabase(); LoadStudentData(); } private void InitializeDatabase() { string connectionString = @”Data Source=DESKTOP-F1SA8LE;Initial Catalog=StdExample; User Id=root;Password=;”; connection = new MySqlConnection(connectionString); cmd = new MySqlCommand(); connection.Open(); cmd.Connection = connection; cmd.CommandType = CommandType.Text; } private void AddStudentbtn_Click(object sender, EventArgs e) { // Add a new student to the database string name = txtName.Text; int age = Convert.ToInt32(txtAge.Text); string section = txtSection.Text; int rollno = Convert.ToInt32(txtRollno.Text); string insertQuery = $”INSERT INTO Students (Name, Age, Section, Rollno) VALUES (‘{name}’, {age},'{section}’,{rollno})”; cmd.CommandText = insertQuery; cmd.ExecuteNonQuery(); // Reload data to update DataGridView LoadStudentData(); // Clear input fields txtName.Text = “”; txtAge.Text = “”; txtSection.Text = “”; txtRollno.Text = “”; } private void LoadStudentData() { // Load student data from the database string query = “SELECT * FROM Students”; da = new MySqlDataAdapter(query, connection); ds = new DataSet(); da.Fill(ds, “Students”); // Display data in DataGridView dataGridView1.DataSource = ds.Tables[“Students”]; } } } |
Advantages of using dotConnect for MySQL
Direct Mode Operation
dotConnect for MySQL enables applications to interact directly with MySQL databases without the need for the MySQL client library. This direct access can lead to reduced complexity, improved performance, and easier deployment, particularly in environments where installing additional client software is impractical or undesirable.
Comprehensive ASP.NET Integration
It offers extensive support for ASP.NET development, including providers for Role, Session State, Membership, Profile, Site Map, and more. This integration significantly simplifies the process of building secure and scalable web applications by leveraging familiar ASP.NET features, enhancing developer productivity and application maintainability.
Optimized Performance
By harnessing MySQL-specific optimizations and features, such as compression protocol and embedded server support, dotConnect for MySQL ensures that applications achieve the best possible performance. Its focus on performance optimization means that developers can create data-intensive applications without worrying about the overhead that typically comes with database connectivity and operations.
Enhanced Security and Monitoring Capabilities
The provider supports a wide array of security features, including SSL and SSH connections and various encryption ciphers, ensuring that data is securely transmitted and stored. Additionally, the free dbMonitor application enables detailed per-component tracing of database events, offering insights into the application’s behavior and aiding in troubleshooting and performance tuning.
Summary
dotConnect for MySQL stands out as a comprehensive solution for .NET developers looking to bridge the gap between their applications and MySQL databases. By offering direct database access, extensive ASP.NET support, exceptional performance optimizations, and robust security features, it simplifies the development process and enhances application efficiency. To truly appreciate the capabilities of dotConnect for MySQL and how it can elevate your development workflow, we highly recommend downloading the free trial. Experience firsthand the difference it can make in your MySQL-based application development.